
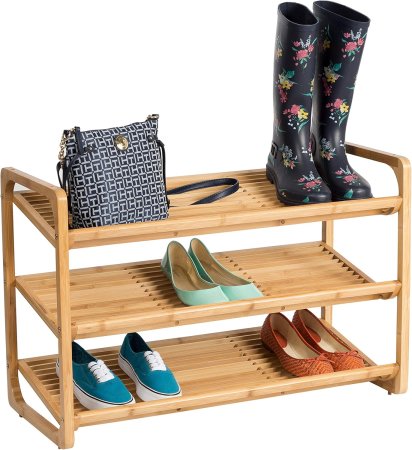
When DIYer Carli Alves decided to build a storage bench where everyone in her family could stash their shoes, she thought it would be the end of their messy mudroom. But in reality, after living with the solution for two years, it proved to be a total flop. “It became the space where shoes went to die,” says Alves. “As soon as it’s closed and you put some pillows on it, it’s just never thought of again.” The seasoned renovator behind the blog Made by Carli realized they needed a shoe cubby that was a bit more in-your-face. After rummaging around in the basement, she and her husband unearthed two bamboo shoe racks they had bought on Amazon—it was then that her wheels started turning.
Opposite the mudroom bench is a small cubby. Once upon a time it was a doorway leading to the pantry, but it eventually became a spot to hang up coats and bags. Alves registered that the shallow nook was the perfect place to create shoe shelves using the bamboo racks they already had handy as their building blocks. Had they bought the racks brand-new, Alves estimates the whole DIY would have only cost $180. Here’s how she pulled it off.
The Materials
Also handy to have around: a measuring tape, a level, scissors, wood filler, scrap wood (Alves used a 1x6x8 piece to frame the countertop sides and add an upper shelf), and paint of your choice.
The Shoe Rack Hack


Step one: Alves unscrewed the bamboo shelves from their vertical racks. To get the slats ready for install, she created a framework within the niche by nailing one-by-two-inch boards to the side walls, back wall, and front so that both the shelves and the countertop (more on that soon) would be supported.
Because her niche was only 12 inches deep, she had to prop the shelves up on an angle, that way no one’s sneakers would stick out past the wall. She used square dowels as brackets, tilting them slightly to rest on the horizontal supports. The top shelf is slightly shorter than the rest, but Alves doesn’t mind that they’re not all perfectly spaced out. “It works out perfectly because my youngest son can put his shoes in there, or we use it for flip flops,” she says.
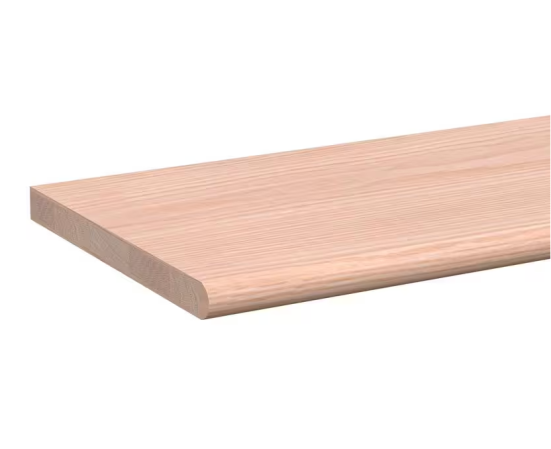
The Stair-Turned-Countertop


From past projects, Alves learned that simple pine treads aren’t just for staircases. In this tiny space, it made for the perfect countertop. “I really liked that it already had that bullnose detail on the end,” she says. “I wanted it to look like a piece of furniture, as if it’s the top of a dresser.”
Using her saw, she trimmed the ends of the piece to fit perfectly on top of her supports, securing it with brad nails and adding scrap wood around the edges to give it a little more definition and character. Then, it was time to fill in any gaps with caulk before swathing the millwork around the bamboo shelves in Patio Stone by Behr.
The Accessories Station
Not letting the upper section of the nook go to waste, Alves decided it would be a perfect place to drop mail and even sunglasses. She installed a small dowel with two cup hooks against the back wall so their shades can hang directly over it. “I love that everything’s easily accessible,” she says.
The Easy Disguise

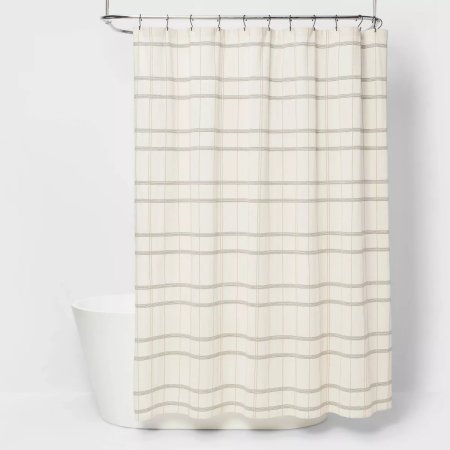
From her dining room table, Alves has a direct view of the mudroom. So even with her clever built-in solution, she was still staring at everyone’s shoes while she ate. Her quick fix? Hide the footwear with a curtain—err, shower curtain. Using what she had handy, she cut the fabric and then cleaned up the seams with an adhesive. That’s right, no sewing involved.
She mounted the curtain on a cafe rod along the base of the countertop. Now, it looks like a beautiful skirt when no one is digging for their sneakers.